Wifite is a powerful automated tool for auditing wireless security. It uses a combination of other tools such as Aircrack-ng, Pyrit, Reaver, Tshark and others to preform it's actions and can be configured for a variety of different attacks. Wifite is curently on version 2. Wifite comes pre-installed with Kali, and is also available for parrot. You can find its GitHub page here.
This tutorial will show you the basics of using Wifite, the goal being able to find a wifi network and crack its password. When you first start up wifite, it will tell you if it's missing any tools. Typically hcxtools and hcxdumptool should be installed if you don't already have them.
If you don't like reading, you can watch the video of this tutorial.
(Note: Change video to 1080p for best viewing quality)
Getting Started
Lets take a quick look at the avilable options we can run with Wifite.
(user@kali)-$ wifite -h
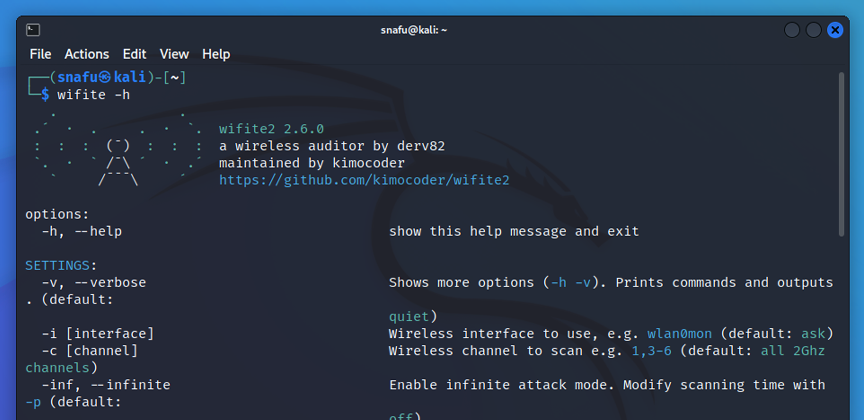
Take a few minutes to scroll through this list and get an idea of the options avilable. There's a lot of cool stuff in here that will help you accomplish many things. The more you know about your target network the more precise your attack can be. For example, if you know the network your going after uses wps, you can use the
--wps-only command and not waste time looking for other types. Before we start scanning for networks lets take a look at our netowrk devices and see what we have avilable. If you are using VMware Player, remember to enable your wifi adapter. Player > Removalbe Devices > and than click on your wlan device.
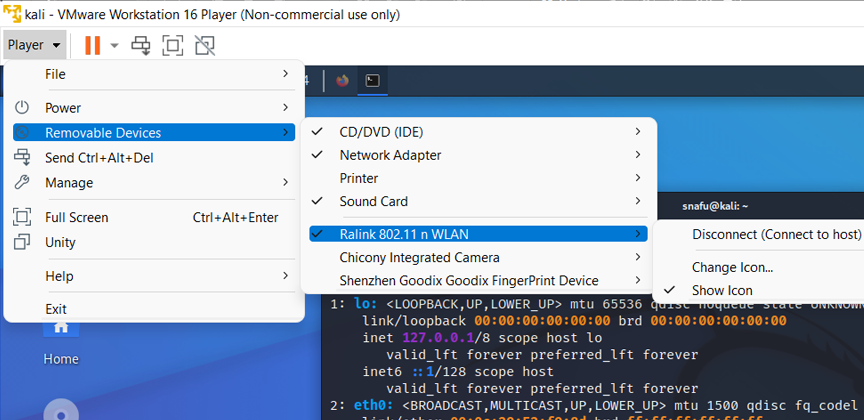
Now lets make sure our connected devices are avilable to use and get their names.
(user@kali)-$ ip a
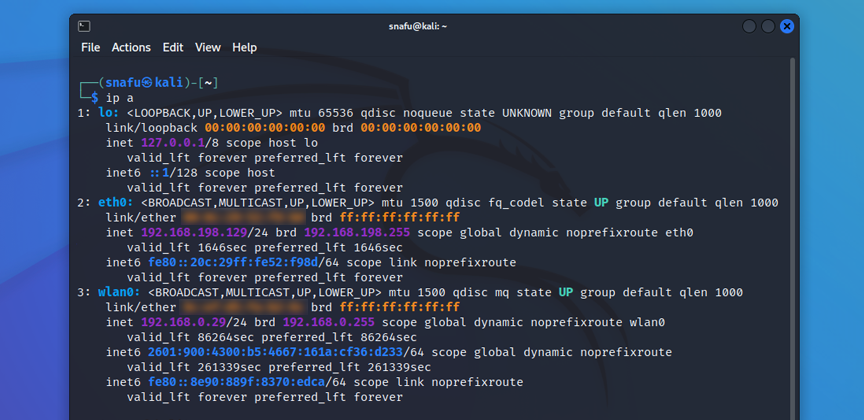
If you're using a virtual machine you'll likely see something very similar to the above picture. If you are using a Raspberry Pi you'll probably see an extra wlan device. Lo is the loopback for your machine, eth0 is a weird connection(ethernet) or if you are using a virtual machine eth0 is probably the wireless device of your main OS. And wlan0 is your first wifi device. On virtual machines this will be your wifi adapter. On a Raspberry Pi wlan0 is the on board wireless card, and wlan1 will be your usb wifi adapter. Since I'm using VMware for this tutorial wlan0 is my usb wifi adapter.
Finding Networks
Now lets find some wifi networks and try to crack a password. Don't be dumb here, use a network you have premission to use. I sugguest making a guest network on your own network and using that. Lets run Wifite and see what we can find.
(user@kali)-$ sudo wifite -mac --kill -i wlan0

Commands explaned
- -mac will generate a random mac address for you.
- --kill will end any processes that may interfare with your wifi adapter.
- -i is used to set which wireless interface(wifi adapter) you want to use. In my case wlan0. This isn't really necessary when you only have one wifi adapter, but it's helpful when you have multiple interfaces.
These are optional commands. I encourage you to referance the wifite command list(
wifite -h) and play around with the ones that suit your needs. Once you run wifite it will go to work, starting with getting your wireless adapter ready for scanning, and making any changes that you specified, such as the -mac command that will generate and random mac for you.
Next wifite will start scanning for networks. By default it will only scan for 2GHz wifi networks. If you want to scan for 5GHz, include the -5 switch on the command line. When you first run a scan with wifite you'll see it output some details.

- The first thing wifite outputs is the options you used, in this case we see random mac and kill.
- Next we see the details about the interface we are using. You'll notice that my interface name changed from wlan0 to wlan0mon, this is because it is now in monitor mode. We also see that it changed it's mac address to random generated one.
- After that wifite actually starts scanning for networks and displays the access points names.
Wifite will continue to scan and update the output. Keep watching your screen untill you see the network you are interested in. Once you see it, press
Ctrl +
C to stop the scan.
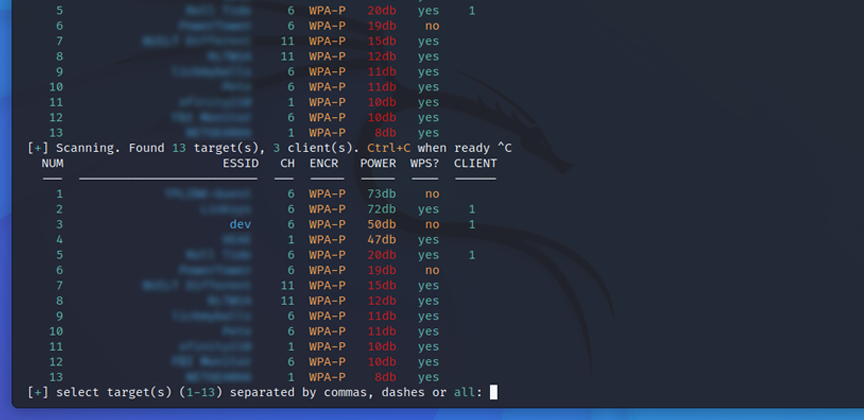
Wifite gives us some details about the networks it finds.
- ESSID - This is the neme of the access point.
- CH - This is channel the access point is operating on. You'll notice we are only seeing 2GHz by default.
- ENCR - Encryption. WEP/WPA
- Power - Power (signal strenght)
- WPS? - If the access point has wps or not.
- CLIENT - How many clients(devices) are connected to the access point. Accuracy will very.
In this case my target network is called dav. I see that it is number 3 on the list. Wifite will prompt you to enter target(s). Since my network is number 3, I will put 3 as my selected target.

As soon as you select your target and hit enter wifite goes to work trying to collecting data from the network that it can use to crack the password. Depending on the type of encryption and the options you use with wifite the output will look different on your screen, but the order will be the same.
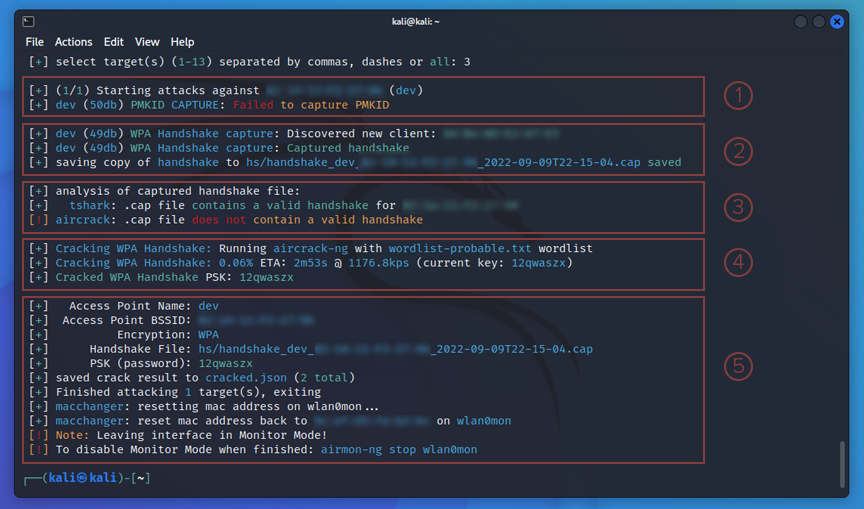
- First we see wifite tries to get a PMKID capture. In this case it fails.
- Next it tries the ol reliable technique of catching a handshake with a deauth attack. It is successful and saves it to a .cap file.
- Now it runs an analysis of the files, tshark(command line version of wireshark) has a valid handshake.
- Now the fun part, wifite runs the capture file against a wordlist. Wifite uses wordlist-probable.txt by default but you can change this with the --dict option. We got lucky this time and wifite was able to break the password. It outputs the password that works, in this case it was 12qwaszx.
- The last thing it outputs is a summery, this includes the access point name, mac address, encryption type, .cap file name and password if it was cracked.
Summary
As you can see, wifite is a powerful and fast tool for checking wireless network security. It provides many options for different types of attacks and configurations. If you are familiar with using Aircrack-ng you will recognize the techniques used here and see the advantage of automation that Wifite offers. Remember, especially if are new to this, explore the options wifite offers by reading the docs on its GitHub page and using the wifite -h in the command line. Happy hacking!


 Commands explaned


